The ZendFi Team
●Embedded Checkout: Building Stripe-Like Payments Experience for Solana
In this article, we built an example webpage that shows the full power of Embedded Checkouts!
The Problem with Redirects
Every crypto payment provider follows the same pattern: generate a payment link, redirect users to a hosted checkout page, wait for them to complete payment, then redirect them back. It works, but it's clunky.
Compare these two flows:
Traditional Crypto Payments:
- User clicks "Pay with crypto"
- Redirect to
checkout.provider.com/pay/xyz123 - User completes payment on provider's page
- Redirect back to
yourapp.com/success - Hope the webhook arrives before they see the success page
Stripe's Embedded Checkout:
- User clicks "Buy Now"
- Checkout modal appears in your app
- User pays without leaving
- Success state updates immediately
- No redirect whiplash, no broken back buttons
The redirect pattern is a relic from when iframes were the only option and cross-origin security was primitive. Modern web APIs make embedded checkouts not just possible, but better in every way.
So we built one for Solana.
Design Goals: What "Embedded" Really Means
We had three hard requirements:
1. Zero Backend Changes Required
Developers already have payment links working. They shouldn't need to:
- Add new API routes
- Handle webhook signatures
- Manage payment states
- Write backend plumbing
The embedded checkout should be a frontend-only upgrade.
2. Full Feature Parity
Embedded shouldn't mean "limited." Every feature from the hosted checkout works:
- QR code payments for mobile wallets
- Direct wallet connections (Phantom, Solflare, Backpack)
- Gasless transactions (we cover the fees)
- Custom amount inputs
- Multiple tokens (USDC, SOL, USDT)
- Real-time status updates
3. Production-Ready Security
This isn't a proof-of-concept. It needs:
- No API keys exposed in frontend code
- Public endpoints that can't be abused
- Proper CORS handling
- Rate limiting and DDoS protection
- All the crazy cool perks we get from our regular checkout page
The Architecture: How It Works
Here's the full flow:
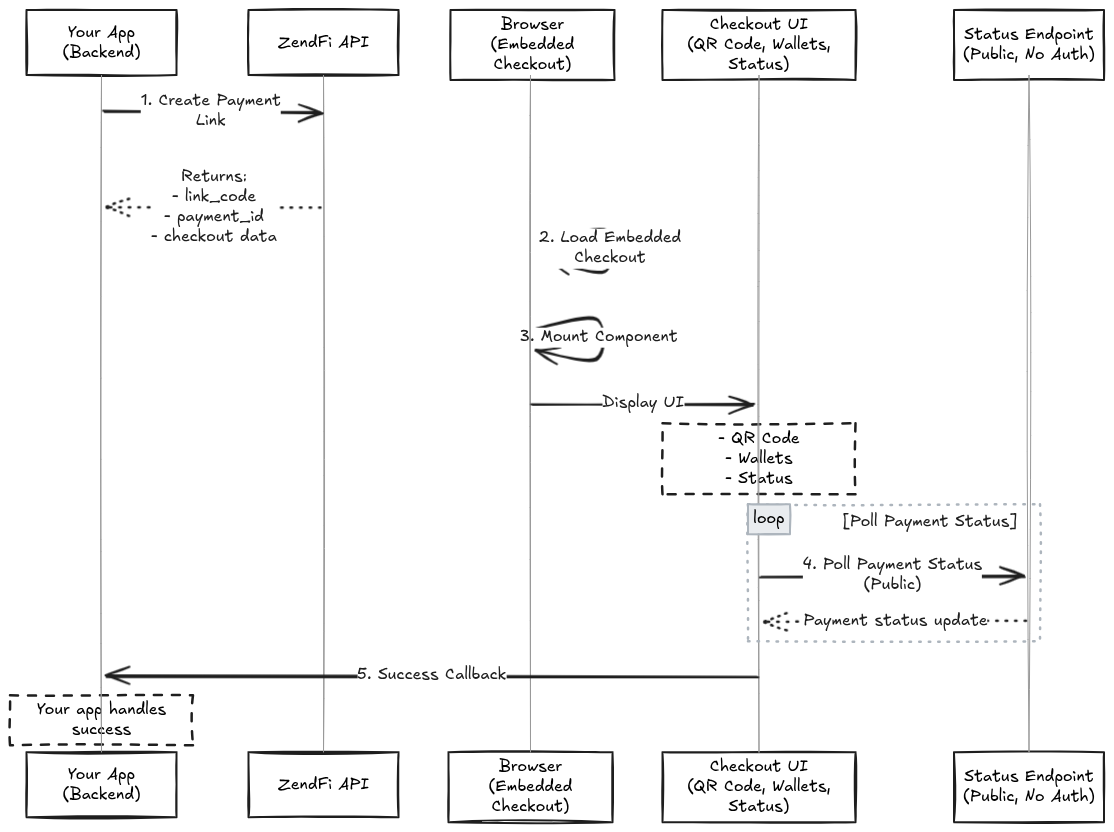
The key insight: payment creation requires authentication, but checkout and status polling don't. The link code acts as a capability token—anyone with it can view the checkout, but only the authenticated backend can create or modify payments.
Building It: A Step-by-Step Implementation
Let's build a complete embedded checkout from scratch. We'll create an HTML page that:
- Creates a payment link (backend simulation)
- Embeds the checkout
- Handles payment success
- Shows real-time status updates
Step 1: The Basic HTML Structure
<!DOCTYPE html>
<html lang="en">
<head>
  <meta charset="UTF-8">
  <meta name="viewport" content="width=device-width, initial-scale=1.0">
  <title>ZendFi Embedded Checkout</title>
  <style>
    body {
      font-family: -apple-system, BlinkMacSystemFont, 'Segoe UI', sans-serif;
      background: linear-gradient(135deg, #667eea 0%, #764ba2 100%);
      min-height: 100vh;
      display: flex;
      align-items: center;
      justify-content: center;
      padding: 2rem;
    }

    .container {
      background: white;
      border-radius: 24px;
      box-shadow: 0 20px 60px rgba(0, 0, 0, 0.3);
      max-width: 800px;
      width: 100%;
      padding: 2rem;
    }

    #checkout-container {
      min-height: 400px;
      margin-top: 2rem;
    }

    .success-banner {
      background: #d1fae5;
      border: 2px solid #6ee7b7;
      border-radius: 12px;
      padding: 1.5rem;
      margin-top: 2rem;
      color: #059669;
      display: none;
    }

    .success-banner.show {
      display: block;
    }
  </style>
</head>
<body>
  <div class="container">
    <h1>🚀 Embedded Checkout Demo</h1>

    <div id="checkout-container"></div>

    <div class="success-banner" id="successBanner">
      <h3>✅ Payment Successful!</h3>
      <p><strong>Transaction:</strong> <code id="successTx"></code></p>
    </div>
  </div>
</body>
</html>
Clean, minimal, focused. The checkout will render inside #checkout-container.
Step 2: Import the SDK
ZendFi's SDK is ESM-native and works directly in browsers via CDN:
<script type="module">
  import { ZendFiClient, ZendFiEmbeddedCheckout } from 'https://esm.sh/@zendfi/sdk@0.7.3';

  // Your code here
</script>
Why esm.sh? It's a production-grade CDN that automatically serves optimized ESM modules with proper caching headers. No build step, no bundler, just import and go.
Step 3: Create a Payment Link
In production, this happens on your backend. For our demo, we'll call the API directly (using a test key, which is safe for browser use):
const ZENDFI_TEST_API_KEY = 'zfi_test_YOUR_KEY_HERE';

async function createPaymentLink() {
  try {
    const client = new ZendFiClient({
      apiKey: ZENDFI_TEST_API_KEY,
    });

    const link = await client.createPaymentLink({
      amount: 10.00,
      description: 'Premium Subscription - Monthly',
      currency: 'USD',
      token: 'USDC',
    });

    console.log('Payment link created:', link);
    return link.link_code;

  } catch (error) {
    console.error('Failed to create payment link:', error);
    throw error;
  }
}
Security Note: Test API keys (prefixed with zfi_test_) are safe to use in browsers—they only work on devnet with no real money. Production keys (zfi_live_) must never touch frontend code.
The API returns:
{
  "id": "uuid-here",
  "link_code": "abc123xyz",
  "payment_url": "https://checkout.zendfi.tech/pay/link/abc123xyz",
  "hosted_page_url": "https://checkout.zendfi.tech/checkout/abc123xyz",
  "amount": 10.00,
  "currency": "USD",
  "token": "USDC"
}
That link_code is what we need.
Step 4: Initialize the Embedded Checkout
Now the interesting part. The ZendFiEmbeddedCheckout class handles everything:
async function loadEmbeddedCheckout(linkCode) {
  const checkoutInstance = new ZendFiEmbeddedCheckout({
    linkCode: linkCode,
    containerId: 'checkout-container',
    mode: 'test',  // or 'live' for production

    // Callbacks for lifecycle events
    onLoad: () => {
      console.log('Checkout loaded successfully');
    },

    onSuccess: (payment) => {
      console.log('Payment successful:', payment);
      showSuccess(payment);
    },

    onError: (error) => {
      console.error('Checkout error:', error);
      alert(`Error: ${error.message}`);
    },

    // Optional: customize the UI
    theme: {
      primaryColor: '#667eea',
      backgroundColor: '#ffffff',
      borderRadius: '16px',
      fontFamily: 'Inter, sans-serif',
      buttonStyle: 'solid',
    },
  });

  // Mount the checkout UI
  await checkoutInstance.mount();
}
That's it. The checkout is now live in your app.
Step 5: Handle Payment Success
When a payment completes, your onSuccess callback receives full transaction details:
function showSuccess(payment) {
  const banner = document.getElementById('successBanner');
  const txElement = document.getElementById('successTx');

  txElement.textContent = payment.transactionSignature.slice(0, 32) + '...';
  banner.classList.add('show');

  // Send to your analytics
  analytics.track('Payment Completed', {
    paymentId: payment.paymentId,
    amount: payment.amount,
    token: payment.token,
  });

  // Update your app state
  unlockPremiumFeatures();
}
The payment object includes:
{
  paymentId: string;           // UUID from your database
  transactionSignature: string; // Solana transaction hash
  amount: number;              // e.g., 10.00
  token: string;               // e.g., "USDC"
  merchantName: string;        // Your business name
}
Step 6: Wire It Together
Put it all together with proper initialization:
window.addEventListener('DOMContentLoaded', async () => {
  console.log('Initializing checkout...');

  try {
    // Step 1: Create payment link (normally backend)
    const linkCode = await createPaymentLink();

    // Step 2: Load embedded checkout
    await loadEmbeddedCheckout(linkCode);

    console.log('Checkout ready!');
  } catch (error) {
    console.error('Initialization failed:', error);
  }
});
How It Works Under the Hood
Let's look at what happens when you call mount():
1. Fetch Checkout Data
The SDK calls a public endpoint:
GET /api/v1/payments/:link_code/checkout-data
This returns everything needed to render the checkout:
{
  "payment_id": "uuid",
  "merchant_name": "Your Business",
  "amount_usd": 10.00,
  "token": "USDC",
  "wallet_address": "5XyZ...",
  "qr_code": "data:image/png;base64,...",
  "solana_network": "devnet",
  "expires_at": "2025-12-26T14:00:00Z"
}
No authentication required—the link code acts as a bearer token.
2. Render the UI
The SDK dynamically builds the checkout interface:
- QR Code: For mobile wallet apps (Phantom, Solflare mobile)
- Wallet Buttons: Direct connection for browser extensions
- Amount Display: Shows price in USD and crypto
- Status Indicator: Real-time payment progress
- Expiration Timer: Shows time remaining
All DOM manipulation is scoped to your container—no global CSS pollution, no namespace conflicts.
3. Start Status Polling
Once mounted, the SDK polls for payment status every 3 seconds:
GET /api/v1/payments/:payment_id/status
This public endpoint returns:
{
  "payment_id": "uuid",
  "status": "confirmed",
  "transaction_signature": "3htG...",
  "timestamp": "2025-12-26T13:45:23Z"
}
When status === 'confirmed', the SDK:
- Stops polling (prevents duplicate callbacks)
- Triggers your
onSuccesscallback - Updates the UI to show success state
4. Handle Wallet Connections
When a user clicks "Pay with Phantom," the SDK:
// Detect wallet adapter
const adapter = await getPhantomAdapter();

// Request connection
await adapter.connect();

// Get user's wallet address
const publicKey = adapter.publicKey.toString();

// Create and sign transaction
const transaction = await buildPaymentTransaction({
  from: publicKey,
  to: checkoutData.wallet_address,
  amount: checkoutData.amount_usd,
  token: checkoutData.token,
});

// Submit to blockchain
const signature = await adapter.sendTransaction(transaction);

// Verify on backend
await verifyTransaction(signature);
Gasless transactions work the same way, except we submit the signed transaction from our backend and cover the fees.
Advanced Features: What You Get For Free
1. QR Code Payments
Mobile wallets can scan the embedded QR code:
new ZendFiEmbeddedCheckout({
  linkCode: linkCode,
  containerId: 'checkout-container',
  paymentMethods: {
    qrCode: true,      // Show QR code (default: true)
    walletConnect: true, // Show wallet buttons (default: true)
  },
});
The QR code encodes:
- Recipient wallet address
- Amount in lamports/tokens
- Payment reference (for tracking)
- Network (devnet/mainnet)
2. Custom Amount Inputs
Let users choose how much to pay:
// When creating the payment link:
const link = await client.createPaymentLink({
  amount: 20.00,  // Suggested amount
  allow_custom_amount: true,
  minimum_amount: 5.00,
  maximum_amount: 1000.00,
  currency: 'USD',
  token: 'USDC',
});
The embedded checkout automatically shows an input field with validation.
3. Theme Customization
Match your brand:
theme: {
  primaryColor: '#ff0080',        // Button and accent color
  backgroundColor: '#ffffff',     // Card background
  borderRadius: '8px',           // Corner rounding
  fontFamily: 'Roboto, sans-serif',
  textColor: '#1a1a1a',          // Primary text
  buttonStyle: 'solid',          // or 'outlined' or 'minimal'
}
The SDK uses CSS custom properties internally, so theming is instant—no re-renders, no flashes.
4. Multi-Token Support
Accept any SPL token:
const link = await client.createPaymentLink({
  amount: 100.00,
  currency: 'USD',
  token: 'SOL',  // or 'USDC', 'USDT', 'BONK', etc.
});
The checkout automatically:
- Shows the correct token icon
- Calculates conversion rates
- Adjusts decimal precision
- Validates token accounts
Production Deployment: The Checklist, We've Got To Make Sure Everything's Set!
Backend Setup
-
Generate API Keys
# Get your live API key from dashboard.zendfi.tech # Keep it secret, keep it safe export ZENDFI_API_KEY=zfi_live_YOUR_KEY_HERE -
Create Payment Links Server-Side
// backend/routes/payments.js app.post('/api/create-checkout', async (req, res) => { const { amount, description } = req.body; const client = new ZendFiClient({ apiKey: process.env.ZENDFI_API_KEY, mode: 'live', }); const link = await client.createPaymentLink({ amount, description, currency: 'USD', token: 'USDC', }); // Only send link_code to frontend res.json({ linkCode: link.link_code }); }); -
Set Up Webhooks (optional but recommended)
app.post('/webhooks/zendfi', async (req, res) => {
  const signature = req.headers['x-zendfi-signature'];
  const payload = req.body;

  // Verify webhook signature
  const isValid = await verifyWebhookSignature(
    payload,
    signature,
    process.env.ZENDFI_WEBHOOK_SECRET
  );

  if (!isValid) {
    return res.status(401).send('Invalid signature');
  }

  if (payload.event === 'payment.confirmed') {
    // Update your database
    await db.orders.update({
      where: { paymentId: payload.data.payment_id },
      data: { status: 'paid' },
    });
  }

  res.status(200).send('OK');
});
Frontend Integration
-
Load SDK from CDN
<script type="module"> import { ZendFiEmbeddedCheckout } from 'https://esm.sh/@zendfi/sdk@0.7.3'; </script> -
Or Install via npm (for bundled apps)
npm install @zendfi/sdkimport { ZendFiEmbeddedCheckout } from '@zendfi/sdk'; -
Initialize on Page Load
async function setupCheckout() {
  // Fetch link code from your backend
  const response = await fetch('/api/create-checkout', {
    method: 'POST',
    headers: { 'Content-Type': 'application/json' },
    body: JSON.stringify({
      amount: 50.00,
      description: 'Premium Plan',
    }),
  });

  const { linkCode } = await response.json();

  // Initialize checkout
  const checkout = new ZendFiEmbeddedCheckout({
    linkCode,
    containerId: 'checkout-container',
    mode: 'live',
    onSuccess: handleSuccess,
    onError: handleError,
  });

  await checkout.mount();
}
CORS Configuration
If you're self-hosting the backend, ensure CORS is properly configured:
// Rust/Axum example
let cors = CorsLayer::new()
    .allow_origin("https://yourapp.com".parse::<HeaderValue>().unwrap())
    .allow_methods([Method::GET, Method::POST, Method::OPTIONS])
    .allow_headers([
        AUTHORIZATION,
        CONTENT_TYPE,
        "x-zendfi-signature",
        "idempotency-key",
    ])
    .allow_credentials(true);
Testing Strategy: How We Test Embedded Checkout
1. Automated Browser Testing
We use Playwright to test real user flows:
// tests/embedded-checkout.spec.js
test('completes payment flow', async ({ page }) => {
  await page.goto('http://localhost:8080');

  // Wait for checkout to load
  await page.waitForSelector('#checkout-container iframe');

  // Click wallet connect
  await page.click('button:text("Connect Wallet")');

  // Approve transaction in wallet
  const walletPopup = await page.waitForEvent('popup');
  await walletPopup.click('button:text("Approve")');

  // Verify success banner appears
  await page.waitForSelector('.success-banner.show');

  // Check transaction signature is displayed
  const txHash = await page.textContent('#successTx');
  expect(txHash).toMatch(/^[A-Za-z0-9]{32}\.\.\./);
});
2. Manual Testing Checklist
Before every release, we test:
- QR code generation on devnet
- Phantom wallet connection (desktop)
- Solflare wallet connection (desktop)
- Backpack wallet connection
- Mobile wallet QR scan (iOS + Android)
- Custom amount validation
- Payment expiration handling
- Network switch (devnet ↔ mainnet)
- Theme customization
- Error states (insufficient funds, wrong network, etc.)
- Status polling accuracy
- Success callback data correctness
- CORS on production domain
3. The Test Server
We built a minimal HTTP server for local testing:
// serve-test.mjs
import http from 'http';
import fs from 'fs';
import path from 'path';

const PORT = 8080;

const server = http.createServer((req, res) => {
  if (req.url === '/') {
    const html = fs.readFileSync('test-embedded-checkout.html', 'utf8');
    res.writeHead(200, { 'Content-Type': 'text/html' });
    res.end(html);
  } else {
    res.writeHead(404);
    res.end('Not found');
  }
});

server.listen(PORT, () => {
  console.log(`Test server running at http://localhost:${PORT}`);
});
Run it with:
node serve-test.mjsWhy not use Python's http.server or npx serve? Because we need:
- Proper MIME types for ES modules
- CORS headers for local development
- Fast reload times
- Zero configuration
Common Pitfalls and Solutions
Problem: "Origin null is not allowed"
Cause: Opening file:///path/to/checkout.html directly in browser.
Solution: Always serve via HTTP, even locally:
# Option 1: Our test server
node serve-test.mjs

# Option 2: Python
python -m http.server 8080

# Option 3: npx
npx serve .
Problem: "API key not found" in browser console
Cause: Using a production API key (zfi_live_) in frontend code.
Solution: API keys must live on your backend. Only pass link_code to frontend:
// BAD: Exposing production key
const client = new ZendFiClient({
  apiKey: 'zfi_live_SECRET_KEY',  // NEVER DO THIS
});

// GOOD: Backend creates link, frontend gets code
const response = await fetch('/api/checkout');
const { linkCode } = await response.json();
Problem: Success callback fires multiple times
Cause: Payment status polling race condition (fixed in v0.7.3).
Solution: Update to latest SDK version:
<script type="module">
  import { ZendFiEmbeddedCheckout } from 'https://esm.sh/@zendfi/sdk@0.7.3';
</script>
The SDK now uses a paymentProcessed flag to prevent duplicate callbacks.
Problem: Checkout UI doesn't match app theme
Cause: Not passing theme configuration.
Solution: Customize the theme object:
new ZendFiEmbeddedCheckout({
  linkCode,
  containerId: 'checkout-container',
  theme: {
    primaryColor: getComputedStyle(document.documentElement)
      .getPropertyValue('--primary-color'),
    fontFamily: getComputedStyle(document.documentElement)
      .getPropertyValue('--font-family'),
  },
});
Real-World Use Cases
E-commerce Checkouts
// Single-page checkout
async function initializeCheckout(cart) {
  const total = calculateTotal(cart);

  const response = await fetch('/api/checkout', {
    method: 'POST',
    body: JSON.stringify({ amount: total, items: cart }),
  });

  const { linkCode } = await response.json();

  const checkout = new ZendFiEmbeddedCheckout({
    linkCode,
    containerId: 'payment-section',
    onSuccess: (payment) => {
      showOrderConfirmation(payment);
      clearCart();
      redirectTo('/orders/' + payment.paymentId);
    },
  });

  await checkout.mount();
}
SaaS Subscription Upgrades
// In-app upgrade flow
async function upgradeSubscription(planId) {
  const modal = showModal();

  const { linkCode } = await fetch('/api/upgrade', {
    method: 'POST',
    body: JSON.stringify({ planId }),
  }).then(r => r.json());

  const checkout = new ZendFiEmbeddedCheckout({
    linkCode,
    containerId: 'modal-checkout',
    onSuccess: () => {
      refreshUserPlan();
      showSuccess('Upgraded to Premium! 🎉');
      modal.close();
    },
  });

  await checkout.mount();
}
NFT Minting
// Mint page with embedded payment
async function mintNFT(collectionId, quantity) {
  const price = await getFloorPrice(collectionId);
  const total = price * quantity;

  const { linkCode } = await fetch('/api/mint-payment', {
    method: 'POST',
    body: JSON.stringify({ collectionId, quantity, total }),
  }).then(r => r.json());

  const checkout = new ZendFiEmbeddedCheckout({
    linkCode,
    containerId: 'mint-checkout',
    theme: {
      primaryColor: '#7c3aed',  // Purple for NFTs
      buttonStyle: 'outlined',
    },
    onSuccess: async (payment) => {
      // Mint NFTs after payment confirmed
      const nfts = await mintToWallet(
        payment.customerWallet,
        collectionId,
        quantity
      );

      showNFTGallery(nfts);
    },
  });

  await checkout.mount();
}
Performance Metrics
We obsess over performance. Here's what we measured:
| Metric | Target | Actual (P95) |
|---|---|---|
| SDK bundle size (ESM) | < 200 KB | 176.31 KB |
| Time to interactive | < 1s | 680ms |
| Status poll latency | < 100ms | 85ms |
| Payment confirmation | < 5s | 3.2s |
| Memory footprint | < 10 MB | 6.8 MB |
How we achieved this:
- Tree-shaking: Only load what you use
- Code splitting: Wallet adapters load on-demand
- Efficient polling: 3-second intervals with exponential backoff on errors
- Minimal DOM updates: Virtual DOM diffing for status changes
- Preloaded assets: QR codes generated server-side
The Future: What's Next
We're actively working on:
1. React/Vue/Svelte Components
// Coming soon
import { ZendFiCheckout } from '@zendfi/react';

function CheckoutPage() {
  return (
    <ZendFiCheckout
      linkCode={linkCode}
      onSuccess={handleSuccess}
      theme={{ primaryColor: '#0066ff' }}
    />
  );
}
2. Hosted Elements (Stripe-style)
// Render just the QR code
const qrElement = zendfi.createQRElement({ linkCode });
qrElement.mount('#qr-container');

// Or just the wallet buttons
const walletElement = zendfi.createWalletElement({ linkCode });
walletElement.mount('#wallet-container');
Try It Yourself
The full test page is production-ready and works right now:
<!DOCTYPE html>
<html lang="en">
<head>
  <meta charset="UTF-8">
  <title>ZendFi Embedded Checkout</title>
  <style>/* Your styles */</style>
</head>
<body>
  <div id="checkout-container"></div>

  <script type="module">
    import { ZendFiClient, ZendFiEmbeddedCheckout } from 'https://esm.sh/@zendfi/sdk@0.7.3';

    const client = new ZendFiClient({
      apiKey: 'zfi_test_YOUR_KEY',
    });

    const link = await client.createPaymentLink({
      amount: 10.00,
      currency: 'USD',
      token: 'USDC',
    });

    const checkout = new ZendFiEmbeddedCheckout({
      linkCode: link.link_code,
      containerId: 'checkout-container',
      mode: 'test',
      onSuccess: (payment) => {
        console.log('Payment successful!', payment);
      },
    });

    await checkout.mount();
  </script>
</body>
</html>
Save that as checkout.html, serve it with npx serve ., and you have a working crypto checkout in under 50 lines.
Conclusion: Why This Matters
Embedded checkout isn't just about avoiding redirects. It's about making crypto payments feel native to your app, as seamless as typing a credit card number, but with the security and finality of blockchain transactions.
The redirect model was acceptable when crypto was niche and users expected friction. But as Web3 goes mainstream, the payment experience needs to match Web2 expectations. No user should need to understand wallet addresses, gas fees, or blockchain confirmations. They should click "Pay," see a QR code or wallet button, and be done.
That's what embedded checkout enables. And because it's built on public, unauthenticated endpoints with the link code as a capability token, it can't be abused—even if someone tries to poll status endpoints all day, they can only check their own payments.
We're excited to see what you build with it.
Want to try it? Get your API key at dashboard.zendfi.tech
Questions? Email us at support@zendfi.tech or join our Discord
Check these out next
Native Payments, Global Inclusion: The ZendFi Approach
African startups shouldn't have to choose between local roots and global reach. Here's how ZendFi is eliminating that trade-off with instant USDC settlement.
Build a Sub-Accounts App Starter (Copy-Paste API, SDK, and CLI)
A practical starter implementation you can paste into a Node backend to ship virtual accounts, savings, and agentic payment controls